On the outside this camera looks like any other, but there is a novel engineering solution hidden behind the lens. Instead of the usual flip-up mirror, in the Pellix Canon employed a large, stationary, semi-transparent mirror. This lets about 70% of the light through to reach the film, and reflects the rest of the light up into the viewfinder. The advantage is the absence of camera shake that would otherwise ensue, when the mirror slams against the roof of the mirror housing and when it returns. A further advantage is that 'viewfinder blackout' is eliminated. (This really only matters on longer shutter speeds.)
But, of course, everything comes at a price. In this case, the viewfinder appears slightly dimmer for obvious reasons. Also, the mirror does get dirty after years of use and there is no easy way to clean it. (It would be nice, if it was removable, but it's not.) The manual actually warns against touching the mirror.
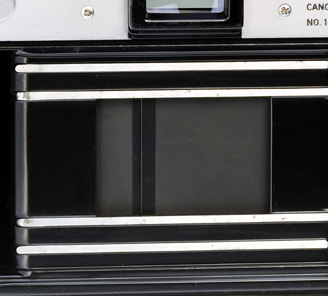
On the first picture below, the shutter is open and we are looking out through the stationary mirror and the lens, whose aperture is partially closed for the exposure. The second picture shows the metal shutter curtains (in the process of winding up the shutter). The shutter curtains could not be made from rubberised cloth, because the semi-transparent mirror does not provide enough protection against the damaging rays of the sun, when the camera is accidentally turned towards it.
On the top of the camera we find the familiar controls plus an extra one, which was not present on earlier models; the viewfinder eyepiece shutter. This is the ring under the film rewind knob. When an index mark on the side of the ring is aligned with the black rectangle, a metal plate inside closes the viewfinder window. On many modern cameras this measure is necessary, because light entering the viewfinder can fool the internal lightmeter. However, on the Pellix this is not the reason. Instead, the viewfinder eyepiece shutter was included, because in the absence of a swing-up mirror stray light can fog the film during exposure. (Obviously, I'm talking about those picture-taking situations, when the photographer doesn't shield the viewfinder window with his head.)
The ring also doubles as a battery check control. To check the battery, first set the film speed dial to 100 ASA and the shutter speed dial to X. Then turn the ring towards the blue dot next to the letter C and observe the needle in the viewfinder. Battery power is sufficient, if the needle sits on, or above a little circle.The lightmeter of the Pellix is also interesting. The sensor is hidden beneath the floor of the mirror box and it only pops up, when the lightmeter is switched on. To switch on the lightmeter, the user pushes the self-timer lever towards the lens. (It can be locked into position, as on the picture below.) The lens' aperture also closes down - metering in this camera is the 'TTL stop-down' type. The sensor measures the light in the middle of the field covering about one-tenth of the entire area. This is indicated with a rectangle in the viewfinder.
Finally, let me introduce the lightmeter Booster. This accessory was specifically designed for the Pellix and the FT. It extends the sensitivity of the camera's lightmeter down to EV 1.5 (1/2 sec. @ f/1.2) when using 100 ASA film. The exposure time dial on the meter reads from 1/60 to 30 sec. The unit uses two 1.3 volt button cells for metering and another one for the illumination of the indicator window.
The 55mm f/1.2 lens is the ideal standard lens to use with this camera. The large opening compensates for the light loss caused by the pellicle mirror.
Further reading:
- other cameras in my collection
- a survey of Canon SLR lens mounts
| Click here to leave a comment |


