
The Pentina fm is a rather oddly designed camera. Its appearance suggest something other than a SLR, but in fact that is what it is. The flat top hides a pentaprism. The leaf shutter is built into the camera body and the mirror and a bottom plate pair up in a V shape to shield the film from light when the shutter is open for viewing.

The body is housed in an aluminium frame. This frame is made of a single piece of metal and fits very tightly over the body. This is one of the reasons why this camera has a reputation of being a pain in the neck to repair.
Pentina fm cameras are often found with a jammed shutter. The film advance lever will refuse to turn and the shutter release button is locked. This problem can manifest itself before or after cocking the shutter. If one is able to look through the viewfinder, then the shutter has been cocked. If the viewfinder is dark (i.e. the viewfinder eyepiece shutter is closed), then the the shutter has been released. It may be that the jamming took place in between the sequence of events in which case the viewfinder eyepiece shutter can end-up half-closed in the viewfinder.
So, what to do when you find a Pentina fm with this problem? My best advice is this: grab it with your stronger hand, look for a distant target, give your arm a good swing, and hurl .......
No, sorry, you should not do that. Calm down, get your tools out, roll up your sleeves and begin to work.
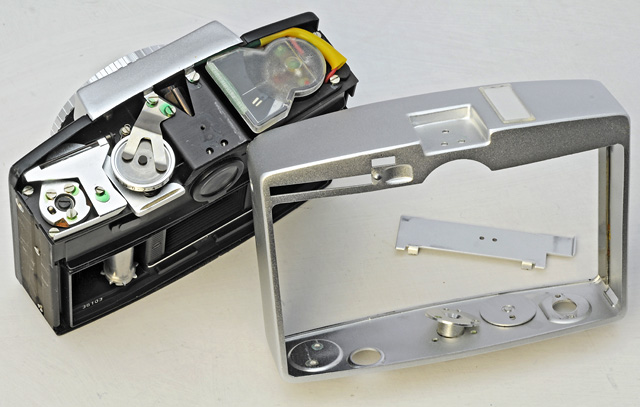
Unfortunately,
not much can be
done without first getting the camera body (the black part) out of its aluminium frame. So, lets begin with that.
Taking a Pentina fm camera body out of its aluminium housing
Almost all screws and bits and pieces on all sides have to be removed. However, contrary to what you might have read on the internet, the lens mount and the front plate do not have to be taken out in order to separate the body and the frame. (To date the most detailed disassembly description I found on the internet is in French, but it is both incorrect and incomplete.) So, here we go:
- Pop off the shiny plate on the top of the accessory shoe and unscrew the three screws underneath.
- Take out the shoulder strap lugs on both sides. They maybe hard to unscrew. Try a piece of rubber first, but if you need to resort to a pair of pliers, make sure you use some padding in order to prevent scratching the metal.

Now onto the bottom...

- Remove the film type reminder dial. You need to use a spanner wrench here with pointy ends.
- Next is the film rewind release button. Both the button and the surrounding ring have to be unscrewed. The latter might be hard to turn. I actually had to cut notches into it to be able to get a grip on it.
- The spanner wrench is required again for the removal of the ring around the tripod socket. There are three screws under it which must also come out. The actual tripod socket (the bit that sticks out) stays.
- Now the tricky bit: Turn the ASA dial to 1600 and you will see a hole. Inside that hole there is a small black screw (ref. green arrow on the picture). Remove it.
- Another tricky bit; the film rewind button and shaft. This part just has to be pulled out, but in my case it was impossible to do, because the U shaped wire inside the camera (ref. red arrow on the picture) got caught in the upper groove of the shaft and held it firmly in its grip. No matter how much I wrestled with it, the shaft just would not move any further. Then an ingenious idea stroke my mind; if I fill up the groove with something, then it should surely slide out, no problem. I used sewing thread to do just that.

Now, if you have removed all the parts you see on the following picture, then you should be able to slide the camera body out of its shiny aluminium frame in a forward direction. (The word slide is misleading. You have to push hard and apply pressure here and there and all around and hope that no-one is close by to hear you swearing.)

This is what you will end-up with. Notice how the camera back latch just drops out when the frame comes off the body.
Fixing a jammed shutter in the Pentina fm
If the shutter cocking lever refuses to turn or the shutter button is locked it is not immediately clear where the cause of the problem is. Of course, the most likely culprit is the shutter itself, but before we take on the not altogether easy task of disassembling the shutter lets look at some other, more easily accessible places, where something may have gone wrong.
Part of the winding mechanism can be found on the bottom of the camera. After removing two small screws we can lift up the bottom plate and
take a peek inside as the following picture shows.
The two red arrows point to screws I will refer to later.

The next thing we might want to examine is the film advance lever and the associated linkages. When I worked on my Pentina fm I disassembled virtually everything on the top of the camera. As it turned out, there was nothing wrong here, but for good measure I explain how to take this section apart in case you wanted to, say, clean the viewfinder optics.
In order to remove the light meter, one has to first separate the front panel from the body on that side, because one of the screws hides under the rim of the front panel. This is not hard. The front panel wraps around to the side and you will find two screws there. Just unscrew those and pull the opposite edge of the front panel out from under the base of the lens mount.

The cogwheel indicated by the pink arrow is the one which transfers the settings on the aperture and shutter speed setting rings to the light meter.
The film advance assembly is trickier to remove. To find and take out the necessary screws is easy enough, but then how do you lift out the assembly? There is a spring underneath which is responsible for the return of the film advance lever and it stubbornly holds onto the body. Apart from that, the rim of the front plate gets in the way. You would think that the front plate must definitely come off first. However, that would necessitate the removal of the ring around the shutter release button. So, here we have a problem.
Whatever you do, do not try to unscrew the ring around the shutter release button. The next picture (which was taken after the film advance assembly had been removed) shows why. Apart from the fact that it is hard to take a good hold on the ring without damaging it, it is secured by a set screw!


And now, lets move on and separate the shutter from the body. The first step is to unpack the lens mount with its various rings. Remove the four black screws at the front. Lift off the rings one by one and put them aside. When you get to the alumininum front plate you also have to take out the two little feet. Then the front plate should come off, but it might take a little juggling to get it over the flash socket on the side and from underneath the shutter speed selector lever. You will find another ring under the front plate; this is the flash sync selector. Be careful when you remove it, because there is a tiny ball and spring under it. They provide the click stops. Ref. the green arrow on the picture.

Notice, that to get this far we did not have to take the camera body out of its aluminium frame. Unfortunately, we cannot go any further without doing it. This is, because the bottom two screws which tie the shutter to the body can only be removed from the inside. Ref. the two red arrows on a picture earlier.
To remove the two bolts at the top is easy. The following picture shows the shutter detached from the body.

The next picture shows the shutter in more detail. As you can see, the shutter is open. This should not be the case. There is something obviously wrong here.

I started to disassemble the shutter from the back and this is what I found. The shutter blades were 'welded' together.

I used lighter fluid to loosen them up. Then cleaned them and re-assembled the shutter. It then started to work beautifully.
If you want to take a look at the internals of the shutter from the other side, this is what you can expect to find:

I will not discuss the shutter any further as that is a topic for another day. The leaf shutter is an intricate beast, so I would not recommend messing with it unless you know what you are doing.
Further reading:
- some other camera and lens restoration work I have done
- common problems with older lenses
- cameras in my collection
Other blogs by me:
- Roland FP-30 'secrets'; playing GS instruments on the Roland FP-30 digital piano.
| Click here to leave a comment |